
How to Tie Down a Motorcycle in a Truck Bed: Step-by-Step
This post contains affiliate links. As an Amazon Associate, we earn from qualifying purchases.
To tie down a motorcycle in a truck bed, secure it upright using two front straps attached to a solid point, a rear strap, and a wheel chock. The front straps should compress the front suspension about halfway. The exact attachment point and any fuel system prep depend on your specific motorcycle’s manufacturer instructions.
That last line is the whole game. The official manuals for a Honda CRF dirt bike and an Indian Scout cruiser give opposite commands on where to hook the front straps, which is a critical step in how to tie down a motorcycle in a truck bed. One procedure will damage the other bike.
What follows is the universal process, built from the steps every manual does agree on. Then we’ll walk through the manufacturer splits, where to hook, whether to drain fuel, so you can match the method to your machine. By the end, you’ll know how to read your own bike’s manual for the one detail that changes everything.
Key Takeaways
- Use two front straps and one rear strap with a wheel chock; this is the minimum stable configuration every manual assumes.
- Compress the front suspension about halfway when tightening; this is the specific measurement from the Honda CRF250R/RX manual to prevent fork seal damage.
- The front tie-down attachment point is model-specific: Honda CRF250R/RX and CRF450R/RX/RWE manuals specify the handlebars, while Polaris/Indian and Yamaha XSR 900 manuals forbid using the handlebars and specify the triple clamp or frame.
- Brace the front wheel against the truck bed wall or a chock before strapping; this stops forward roll, which straps alone cannot handle.
- Check for contact with control cables or wiring; a vibrating strap can saw through a clutch line during highway driving.
The Gear You Actually Need
You need four things. Not three, not five. Get these four right and the rest is procedure.
First, tie-down straps. Avoid rope, it can loosen. Honda manuals state this explicitly. You want motorcycle-specific straps with soft loops or hooks that won’t scratch. Cam-buckle straps work, but a ratchet’s incremental tightening is easier on your back and the bike’s suspension when you’re hitting the correct compression.
Second, a front wheel chock. This isn’t optional for solo loading. It holds the bike upright while you get the first strap on. A front wheel chock is a one-time buy that pays off every time you load.
Third, a loading ramp. The Honda and Polaris manuals both recommend one. Loading ramps should be rated for your bike’s weight. Trying to muscle a bike over the tailgate is how you end up with a dented truck and a sprained wrist.
Fourth, a set of soft loops or a handlebar harness. If your bike’s manual says to strap to the handlebars (like Honda’s does), these protect the grips and controls. If it says to use the triple clamp (like Indian’s does), soft loops give you a clean, non-marring point to hook onto.
Before you start: A motorcycle can fall in seconds if a strap slips or a hook fails. Clear the area around the truck before you start. Never stand directly in front of or behind the bike while tightening straps.
The Core Tie-Down Procedure
This is the sequence for how to tie down a motorcycle in a truck bed. Follow it in order.
- Position the wheel chock. Place it in the truck bed, centered between the wheel wells and far enough forward that the bike’s front tire will sit snug against the front of the bed or the chock’s own stop.
- Load the bike. Using your loading ramp, walk the bike up into the bed and into the chock. Engage the chock. Set the bike upright. Consult your manual, as some (like Polaris/Indian) prohibit using the side stand during transport.
- Brace the front wheel. Roll the bike forward until the front tire is firmly against the front wall of the truck bed or the chock’s stop. This is the step Honda’s manual calls out: “brace the front wheel against the front of the truck bed.”
- Attach the front straps. Hook the lower ends to sturdy tie-down points on the truck bed, as far apart as possible for stability. Now, attach the upper ends. This is where you must check your manual.
- Tighten the front straps. Tighten each side evenly. You’re listening for a change in resistance and watching the front suspension compress. The Honda CRF250R/RX manual specifies: “Tighten both front straps until the front suspension is compressed about half-way.” Stop there. Overtightening can blow fork seals.
- Secure the rear. Run a strap from a solid point on the rear of the bike to a rear tie-down point in the truck. The goal is to prevent side-to-side movement. The Honda manual says: “Use another tie-down strap to keep the rear of the motorcycle from moving.”
- Final inspection. Tug every strap. Ensure nothing is touching brake lines, wiring, or plastic fairings. Ensure the side stand is up if your manual prohibits it during transport (the Polaris/Indian manual does). Give the bike a firm shake. It should feel planted, with no wobble in the wheel or play in the straps.
| Step | Action | The “Why” – What Happens If You Skip It |
|---|---|---|
| 1. Chock Placement | Centers bike, provides forward stop. | Bike can roll during loading, risking a tip-over before you even strap it. |
| 2. Load with Ramp | Safely lifts bike to bed height. | Manhandling a bike over the tailgate almost guarantees a drop and body damage. |
| 3. Brace Front Wheel | Creates a physical forward stop. | Straps alone must fight all braking force; the bike can lurch forward, loosening straps. |
| 4. Attach Front Straps | Creates the main anchor. | A single strap lets the bike pivot; two opposing straps create a triangulated lock. |
| 5. Tighten to Mid-Compression | Sets correct strap tension. | Too loose: bike sways. Too tight: suspension tops out, damaging fork seals and stressing frames. |
| 6. Secure the Rear | Eliminates lateral sway. | The rear can swing like a pendulum in turns, destabilizing the entire setup. |
| 7. Final Inspection | Catches contact points and loose hardware. | A strap on a brake line can wear through in transit. |
The One Rule Every Manual Agrees On
Despite their disagreements, every OEM source agrees on one essential point: secure the motorcycle in an upright position, using motorcycle tie-down straps.
The Honda CRF250R/RX and CRF450R/RX/RWE manuals use that phrasing. The Polaris/Indian manual advises using a truck or trailer and not towing. They all tell you to avoid using rope. They all assume you’re using a truck or trailer, not towing the bike with a wheel on the ground.
This is the foundation of how to tie down a motorcycle in a truck bed. The bike must be vertical. The straps must be designed for the task. The transport vehicle must have a solid, flat bed. Everything else, the attachment debate, the fuel question, is a variation built on this stable base.
Transporting the Motorcycle: “Secure the motorcycle in an upright position, using motorcycle tie-down straps. Avoid using rope, which can loosen and allow the motorcycle to fall over.” – Honda CRF250R/RX Owner’s Manual
Where the Manuals Disagree (And Why It Matters)

This is where most generic guides fail. They pick one method and present it as universal. The factory service documents do not agree. Your bike’s construction decides which set of rules you follow.
Disagreement 1: Front Tie-Down Attachment Point
This is the biggest split. It comes down to whether your handlebars are a solid structural part of the fork.
- Honda’s Directive (CRF250R/CRF450R): “Attach the upper ends of the straps to the handlebar (one on the right side, the other on the left), close to the fork.” Honda’s competition dirt bikes have handlebars that are bolted directly to the top triple clamp. They are a solid anchor.
- Indian/Polaris & Yamaha’s Directive: The Indian Scout manual states: “Do not restrain the motorcycle using the handlebars. Loop tiedown straps (from the front) up and over the lower triple clamp.” The Yamaha XSR 900 manual echoes this, warning against tying to “rubber-mounted handlebars.” On these street bikes, handlebars are often rubber-damped to reduce vibration and are not a structurally secure tie point.
The Bottom Line: Consult your manual: Honda CRF manuals specify the handlebar, while Polaris/Indian and Yamaha XSR 900 manuals specify the triple clamp or frame and forbid using the handlebars. Look at your bike. If there’s rubber between the bar and the clamp, use the clamp.
Disagreement 2: Fuel Tank Preparation
Most manuals are silent on this. One is very specific.
- Honda CRF250R’s Specific Pre-Transport Step: “Relieve the fuel pressure and drain the fuel from the fuel tank into an approved gasoline container.”
- Other Manuals (Indian, Yamaha, Honda CRF450R web manual): No mention of draining fuel.
This is a model-specific instruction from the Honda CRF250R/RX manual. If your manual says to do it, do it. If it doesn’t, you likely don’t need to. Don’t apply the CRF’s rule to a Gold Wing.
Disagreement 3: Side Stand & Transmission
- Polaris/Indian Manual: “Do not engage the side stand during truck or trailer transportation.”
- Yamaha XSR 900 Manual: “Shift the transmission in gear (for models with a manual transmission).”
- Honda Manuals: Do not mention either.
These are extra stability measures. Leaving the side stand down on a bouncing trailer can bend it. Putting the bike in gear adds resistance to the rear wheel moving. These are manufacturer-specific instructions; the Polaris/Indian manual prohibits the side stand, the Yamaha XSR 900 manual advises shifting into gear, and Honda manuals do not mention them.
| Manufacturer / Model | Front Attachment Point | Fuel Procedure | Key Unique Instruction |
|---|---|---|---|
| Honda CRF250R/RX | Handlebar, close to fork. | Drain fuel tank, relieve pressure. | Compress front suspension “about half-way.” |
| Indian / Polaris Models | Lower triple clamp (NOT handlebars). | Not specified. | Do not engage side stand during transport. |
| Yamaha XSR 900 | Frame or upper triple clamp (NOT rubber-mounted bars). | Not specified. | Shift transmission into gear. |
Loading Without a Ramp (The Improvised Methods)
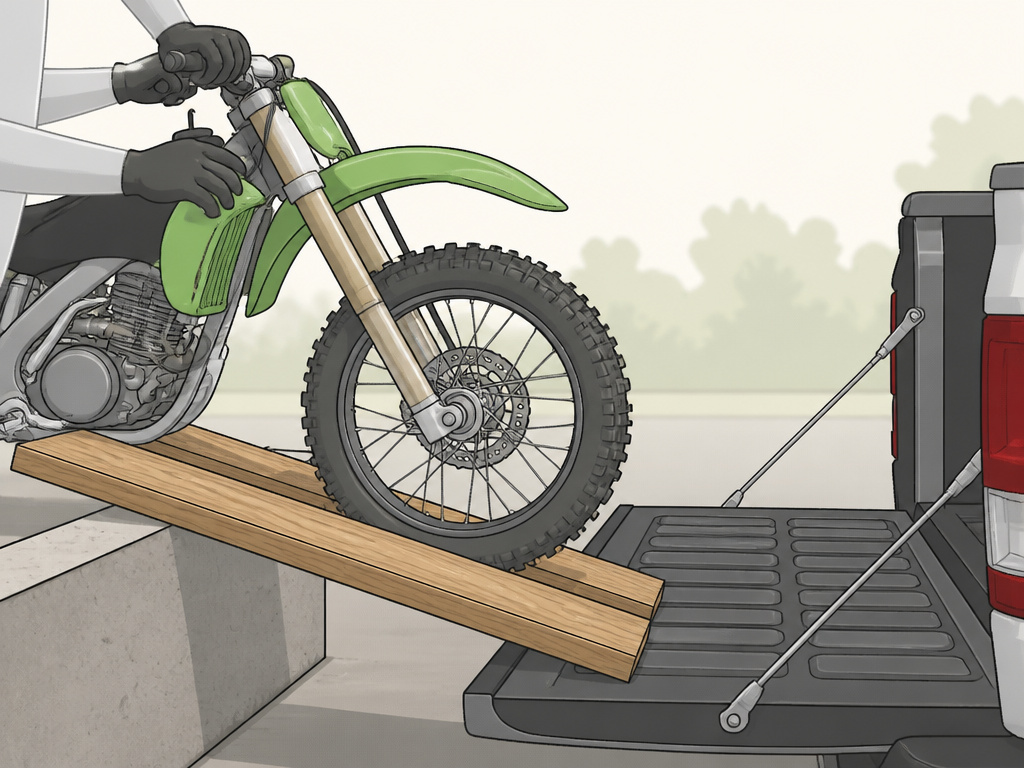
Sometimes you don’t have a ramp. The manuals don’t cover this, but forums and experience do. These methods carry more risk.
- The Two-Plank Method: Use two sturdy, long planks (2x10s or similar) as parallel tracks. This works if you have a gentle slope or a very low truck.
- The Loading Dock Method: Find a curb, hill, or ditch that lets you back the truck’s tailgate up to a raised surface.
- The Muscle Method: With three strong people, you can lift a light dirt bike. For heavier bikes, this is a great way to hurt someone and drop the bike.
Fair warning: every “no ramp” story starts with “we thought we could just…” and often ends with a scratched frame or a visit to urgent care. A loading ramp is recommended for safe loading.
Securing a Faired Motorcycle
Fairings, the plastic bodywork on sportbikes and tourers, change the game. You cannot let a strap touch them. The pressure and vibration will crack or scratch the plastic.
The solution is to ensure straps do not contact fairings, using padding if necessary. A harness distributes the strap force across the handlebars and away from the fairings. Frame sliders provide a dedicated, solid metal loop to hook a soft loop onto. If your bike has neither, you must route straps carefully to the triple clamp or subframe, using towels or foam as padding anywhere a strap might make contact.
These kits often include a harness and specific instructions for faired bikes, taking the guesswork out of routing.
The Drive & The Unload
Your job isn’t over when the truck moves.
- The First Mile Check: Drive a few blocks, pull over, and check every strap. They will settle. Re-tighten if needed.
- Smooth Driving: Accelerate, brake, and turn gently. You have a top-heavy load.
- The Unload: Reverse the process. Loosen the rear strap first, then the front straps evenly. Keep the bike in the wheel chock until you are ready to walk it down the ramp. Never remove all straps before the ramp is in place.
What safety gear do I need to load a motorcycle?
Loading a motorcycle into a truck bed is physical work. Wear sturdy, closed-toe shoes with good grip to prevent slipping on the tailgate or ramp. Gloves protect your hands from sharp edges, hot engine parts, and the friction of pulling straps tight. Consider eye protection from dust or debris. Before you start, ensure the truck is parked on level ground with the parking brake firmly set. Use a proper loading ramp rated for the weight of your motorcycle. Never attempt to load a bike alone if you feel it is beyond your strength or control; a second person to spot and stabilize can prevent a costly and dangerous drop.
Frequently Asked Questions
What is the 12 second rule for motorcycles?
This is a driving tip, not a tie-down rule. When towing a bike, increase your following distance even more for the extra weight and reduced braking power.
Is it better to use ratchet straps or cam buckle straps?
For most riders, ratchet straps offer finer control when achieving the specific “halfway” suspension compression. Cam buckles are faster and lighter, but it’s easier to over-tighten them in a hurry. Both work if you’re careful; ratchets are more forgiving.
How do I tie down a motorcycle by myself?
The key tool is a good front wheel chock. It holds the bike upright while you dismount and attach your first strap. From there, the process is the same. Practice in your driveway before you need to do it for real.
Can I tie a motorcycle down by the swingarm?
You can use the swingarm as a rear tie-down point, but avoid the chain, brake rotor, or any moving part. Hook to the solid, central section of the swingarm or to a passenger footpeg mount. The goal is to limit side-to-side movement, not to hold the bike’s full weight.
How tight should motorcycle tie downs be?
Tighten until the front suspension is compressed about halfway, as specified in the Honda manual. You should see the forks sink noticeably, but the bike should still have suspension travel left. If the forks are fully compressed (topped out), you’ve gone too far and risk damage.
Before You Go
The correct method isn’t a secret. It’s printed in your owner’s manual. The problem is that the “correct” method for a Honda CRF isn’t correct for an Indian Scout.
So here’s your first step, before you buy a single strap: find your bike’s manual. Look up the “Transporting” section. It might be one paragraph. That paragraph holds the one detail, handlebar vs. Triple clamp, fuel drain or not, that decides your entire setup. Match your tie down straps and secure tie-down system to that instruction. Everything discussed here builds out from that manufacturer-specific starting point. Get that wrong, and the rest is just arranging a very expensive accident.
