
How to Mount Motorcycle Saddlebags Without Rails
This post contains affiliate links. As an Amazon Associate, we earn from qualifying purchases.
Mounting motorcycle saddlebags without rails means using attachment points on the bike itself, passenger pegs, frame rails, or the seat base, and securing the bags with straps, aftermarket supports, or DIY brackets, while ensuring at least two inches of clearance from the rear wheel, exhaust, and suspension.
The rule about two inches of clearance isn’t just advice. It’s the physical margin that keeps a bag edge from melting on your pipe or jamming in your rear wheel when the suspension compresses. Skip that gap, and you’re not mounting luggage, you’re rigging a failure. This is a key principle for how to mount motorcycle saddlebags without rails.
What follows is the toolkit for a rail-free setup: the strap systems that work, the model-specific points you can actually bolt to, and the exact pre-ride checks for how to mount motorcycle saddlebags without rails that catch a loose load before it becomes a road hazard. This approach focuses on correctly using the mounting points your bike already has, rather than custom fabrication.
Key Takeaways
- Ensure at least two inches of static and dynamic clearance between the saddlebag and the exhaust, tire, and suspension at full compression.
- Sources disagree on the limit: Harley-Davidson specifies 15 lb (6.8 kg) or 7 lb (3.2 kg) depending on the model, while Saddlemen specifies 10 lbs per saddlebag.
- Use purpose-made motorcycle luggage straps with a non-stretch, secure fastening system instead of bungee cords.
- A test ride with an empty bag is essential to check for movement, contact, and strap security before loading.
- For permanent mounting without factory rails, bolt-on support brackets are mandatory for safe, long-term use.
The Core Principle: Two Inches of Clearance
That number is the minimum clearance gap required to survive real-world riding conditions. A bag that sits an inch from your exhaust pipe at rest will press against it when you hit a bump. The heat from a single ride can melt synthetic fabric or blister leather. Worse, a bag that drifts into the arc of the rear tire gets grabbed and shredded, potentially locking the wheel.
Saddlebags must be at least two inches clear of any exhaust pipe, as stated in the Saddlemen Highwayman Tattoo Saddlebag Installation Instructions.
This clearance must be checked in three dimensions. Side-to-side from the exhaust is the obvious one. You also need vertical clearance from the tire at full suspension compression and horizontal clearance so the bag doesn’t foul the rear shock or swingarm during full travel. The only way to verify this is to test it.
- Mount the empty bags using your chosen method.
- Sit on the bike to compress the rear suspension. Have someone else watch, or use a camera on a tripod.
- Push down hard on the rear end to simulate a big bump. Look and listen for any contact.
- Check the tire clearance by spinning the rear wheel by hand. Listen for any brushing sound.
A contact point sounds like a faint hiss or a dry scrape. If you hear it, you’ve already failed the check. Adjust the bag or add a spacer before proceeding.
Soft Bag Straps: The Throw-Over Method
Many soft saddlebags designed for ‘throw-over’ mounting are suitable for this. They use a central yoke that rests over the passenger seat or rear fender, with long straps that loop under the seat or around the bike’s subframe. The trick is in the tension and the tie-down points.
Use the bike’s existing anchors. Passenger footpeg mounts, the frame rails under the seat, or the rear fender support bolts are all solid points. Never wrap a strap around a plastic body panel or a hollow rear fender, it will crack under load. The goal is a system that tightens down and stays put, not one that slowly slips.
| Common Mistake | The Consequence | The Fix |
|---|---|---|
| Using elastic bungee cords | Hooks detach or cords snap under repeated flexing, dropping the bag. | Switch to non-stretch luggage straps with a secure ratchet or cam buckle system. |
| Attaching to plastic parts | The mounting point fractures, dropping the bag into the rear wheel. | Find a metal bolt or frame member. If none exist, install a dedicated anchor. |
| Uneven left/right tension | The bike pulls to one side, causing unstable handling at speed. | Tighten straps symmetrically, using the same number of wraps on each side. |
The advantage of a soft bag system is its universality and quick removal. The disadvantage is security; a sharp blade can cut a strap in seconds. For commuting or day trips where you can take the bags with you, it’s a solid choice. For longer tours where the bike is left unattended, the lack of lockable security is a real trade-off.
Hard-Mounting Without Factory Rails: DIY Brackets
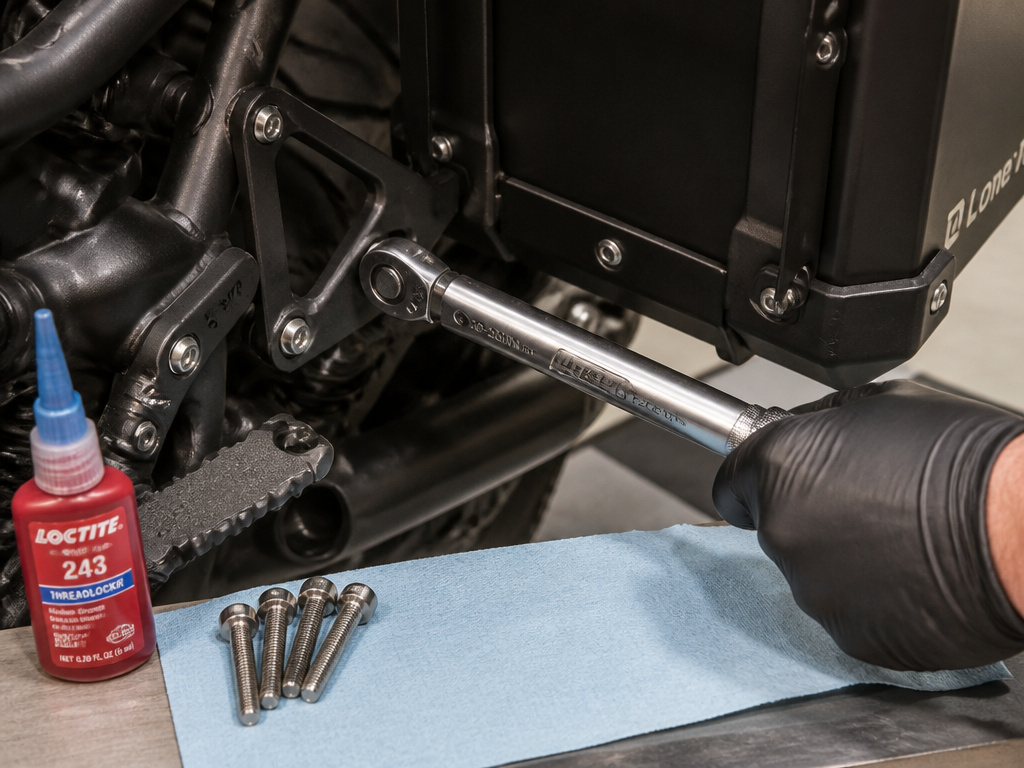
If you want a more permanent solution for hard-sided bags without using the manufacturer’s pannier rail system, you’re entering the DIY bracket territory of how to mount motorcycle saddlebags without rails. This involves fabricating or adapting a metal support that bolts to your bike’s frame or fender supports. Some OEM procedures show this approach, using specific fender support brackets and spacers.
This is a commitment. Drilling into a fiberglass or leather-covered bag is a point of no return.
If you go this route, the hardware and torque specs are essential for keeping the bag from shaking loose and shearing the bolts.
Where this goes sideways: Using hardware store bolts without checking thread pitch. A coarse-thread (3/8-16) bolt forced into a fine-thread (3/8-24) nut will destroy both parts and vibrate loose within miles.
For a Harley-Davidson, torque values vary by mounting point: saddlebag mounting screws are 28–37 N·m (21–27 ft-lbs), while specific bracket screws may be 33.9 N·m (25 ft-lbs) or 51.6–63.8 N·m (38–47 ft-lbs). They also mandate the use of LOCTITE 243 (BLUE) threadlocker on those fasteners. After the first 500 miles, you must re-check the torque on all docking point screws. This maintenance step catches the initial settling of the assembly.
For other bikes, the principle is the same: bolt to a structural point and use a spacer to maintain clearance. The spacer length is critical to maintain the necessary clearance from the bike’s components. Too short, and the bag contacts the bike. Too long, and the bolt acts as a lever, multiplying stress on the mounting point.
The Weight Limit Disagreement (And Why 10 lbs Wins)
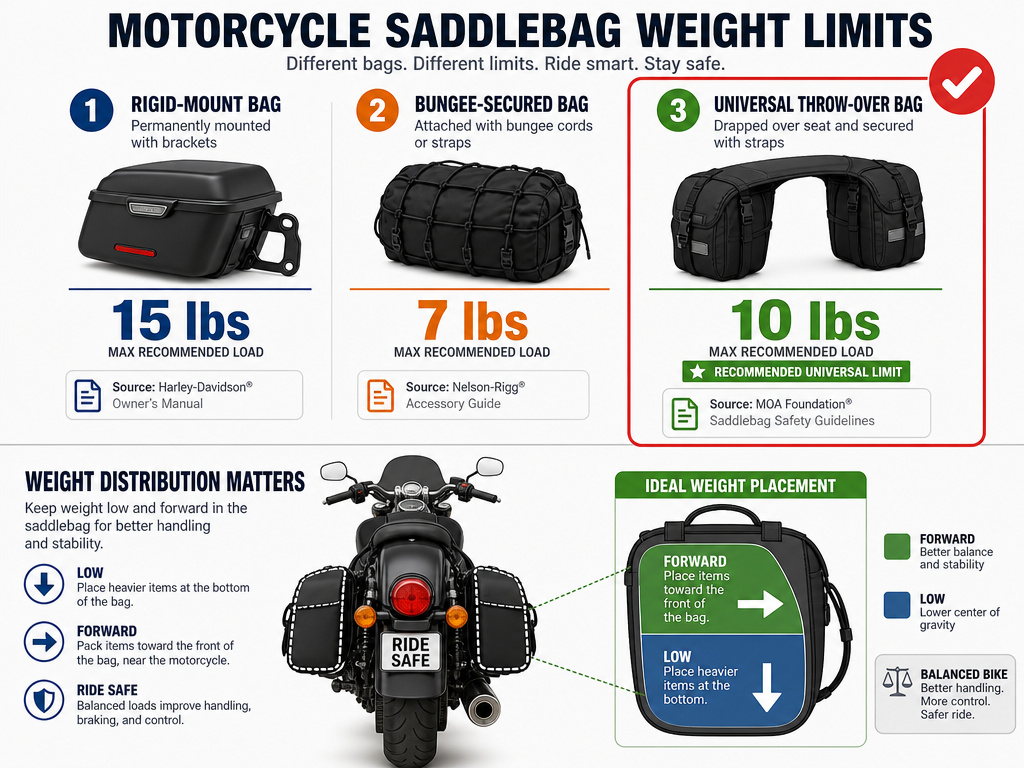
You will find different numbers for how much a saddlebag can hold. Harley-Davidson (source 1) states a maximum saddlebag weight capacity of 6.8 kg (15 lb). Harley-Davidson (source 2) advises not to put more than 7 pounds (3.2 kg) in each saddlebag. The Saddlemen instructions cap it at 10 lbs per saddlebag.
This isn’t an error. It reflects different testing standards, bag construction, and mounting systems. A lightweight throw-over bag on a sportbike has a different stress profile than a leather rigid-mount bag on a touring frame.
| Source | Claimed Limit | Likely Context |
|---|---|---|
| Harley-Davidson (Source 3) | 15 lb (6.8 kg) per bag | Assumes OEM rigid-mount brackets and hardware. |
| Harley-Davidson (Source 4) | 7 lb (3.2 kg) per bag | Specific to a model with a particular bungee-bar support system. |
| Saddlemen (Source 5) | 10 lbs per saddlebag | Universal limit for their aftermarket bags, regardless of mounting. |
The safe rule is to follow the lowest common denominator: treat 10 lbs as your absolute ceiling per side for any rail-free setup. Why? Because exceeding weight capacity doesn’t just risk a broken strap. It shifts the bike’s center of gravity upward and rearward, affecting low-speed handling and stability in crosswinds. Pack the heaviest items, tools, locks, low and toward the front of each bag. Keep the weight even side-to-side; a two-pound difference is noticeable when you’re leaning into a corner.
Before the Test Ride: A 5-Point Safety Checklist
A bag that looks fine in the driveway can fail in the first mile. This checklist takes two minutes and catches the failures that matter.
Before you start: A loose bag can contact the tire or chain, causing a crash. An overloaded bag changes handling. Always complete this check with the bike upright, on its kickstand or centerstand.
- Clearance Audit: Re-check the two-inch gap to exhaust, tire, and suspension. Push down on the rear end again.
- Tug Test: Grab each bag and try to move it vigorously forward, backward, up, and down. There should be minimal play. Any significant shifting means the straps or brackets need tightening.
- Hardware Sight Check: Look at all bolts and buckles. Are any visibly loose or cross-threaded? Are strap ends secured so they can’t flap into the wheel?
- Suspension Function: Does the rear suspension still travel its full range without binding? A strap looped around a shock body can restrict it.
- Light Test: Verify the bags aren’t blocking your turn signals, brake lights, or license plate. This is a legal requirement in most places.
If you pass all five, you’re ready for a low-speed test ride. Take a short loop around the block with the bags empty. Listen for new rattles or scraping sounds. Feel for any pulling or wobble. Only then should you load your gear.
DIY Support Brackets for Saddlebags
If you choose to install the bags without brackets, extra care must be taken. One practical approach is to create custom brackets from materials like aluminum angle, shaped to bridge the gap between the bag and your bike’s fender struts or frame. The smooth back-side of the bags can be drilled to facilitate mounting directly to the fender or fender struts. When fabricating any bracket, ensure it provides a rigid, vibration-resistant connection. Always check that bolts do not extend more than three threads beyond the mounting point and that there is absolutely no contact with the tire, as this can lead to a dangerous failure.
Why Saddlebag Rails or Spacers Are Recommended
Saddlebag supports are HIGHLY RECOMMENDED. Their primary purpose is to create a fixed, stable gap between your bag and the motorcycle. This space is critical for safety. It keeps the bag clear of the exhaust pipe; bags must be at least two inches clear of any exhaust to prevent heat damage. It also prevents the bag from contacting the rear tire during suspension travel, which could shred the bag and cause a crash. Rails and spacers provide a dedicated, rigid structure that handles road vibration and weight, protecting both your luggage and your bike from damage that direct mounting might allow.
Quick-Removal for Aesthetics or Convenience
Many riders prefer a clean look when the bags are off the bike, or want the convenience of easy removal. A rail-free, direct-mount setup often conflicts with this desire, as it typically involves permanent or semi-permanent mounting hardware. If quick removal is a priority, choose a dedicated strap or quick-disconnect system that uses your bike’s existing hard points without requiring custom drilling every time. Any system you use must still provide a secure, non-shifting mount. After installing, pull on the bags to be sure they are locked in position before every ride, as a loose bag is a major hazard.
Frequently Asked Questions
How do I attach saddlebags to my motorcycle without any mounts?
Use a soft saddlebag system designed for “throw-over” mounting. The bags have a central yoke that goes over the seat, with long straps that loop under the seat or around the bike’s frame rails. Secure them with non-stretch ratcheting straps like ROK Straps to solid metal anchor points, not plastic bodywork.
What are the best saddlebags for mounting without rails?
Soft bags designed for strap-on mounting are built for this. They feature integrated straps and durable construction. For a more secure, semi-permanent option, some aftermarket bags can be drilled and bolted directly to fender supports using universal mounting instructions.
Can I mount hard saddlebags without the factory rails?
Yes, but it requires more work. You must fabricate or source brackets that bolt to your bike’s frame or fender supports. You will likely need to drill mounting holes in the bags themselves. This method demands precise measurement, proper hardware (with threadlocker), and adherence to torque specs to be safe.
Why is weight distribution so important?
Motorcycles are sensitive to weight placement. Loading a saddlebag unevenly or putting too much weight high up makes the bike feel unstable, particularly at low speeds and in corners. Always pack heavy items low and centered, and never exceed 10 pounds per bag for a rail-free setup.
The Bottom Line
Mounting bags without rails is a game of managing three forces: gravity, vibration, and heat. The two-inch clearance rule manages heat and suspension travel. The 10-pound weight limit manages gravity and handling. Using ratchet straps and solid anchors manages vibration.
If your setup passes the five-point checklist and survives a test ride empty, it’s probably sound. The one thing you can’t fix on the road is a bag that’s overloaded or mounted to a failing point. When in doubt, go simpler: a well-secured soft bag beats a poorly mounted hard case every time. Your goal is a bag that stays securely in place from your garage to your destination and back, not a custom showpiece.
