
How to Install LED Headlights on a Motorcycle
This post contains affiliate links. As an Amazon Associate, we earn from qualifying purchases.
To install LED headlights on a motorcycle, you need to match the headlight size, disconnect the battery, swap the hardware, connect the wiring, and precisely align the beam. The exact process, including critical torque specifications, varies by make and model, with Indian Scout Bobber screws torquing to 73 in. Lbs. And Harley-Davidson 5-3/4″ bezel screws to 5–8 in. Lbs.
Forget the generic tutorials. The difference between a clean, legal install and a flickering, misaligned mess is in the OEM details the aftermarket guides skip. A wrong torque value strips a thread. A missed alignment step blinds oncoming traffic. This guide walks the specifics of how to install LED headlights on a motorcycle, with the numbers pulled straight from the factory service sheets.
What follows: the four essential tools, the seven-step physical swap, the wiring that actually works, and the precise 25-foot wall alignment for LED beams. It ends with the common mistakes that send riders back to the garage.
Key Takeaways
- Disconnect the negative battery terminal first. This is the single most important safety step to prevent a short circuit or accidental start-up.
- Hand-tighten all bolts before final torque. Manufacturers like Custom Dynamics explicitly warn against using an impact wrench, which can crack housings.
- Torque values are not suggestions. Indian Motorcycle specifies different torque values for different Scout models: the headlight assembly screws on a Scout Bobber require 73 in. Lbs. (8 Nm), while the headlight assembly screw on a standard Scout requires 36 in. Lbs. (4 Nm).
- LED alignment is a two-beam process. Unlike halogen, you must align both the low and high beam hot spots, with the bike loaded and fuel tank full.
- Always use an inline fuse for accessory power. Tapping power for LEDs without a fused circuit risks melting your wiring harness.
The 4 Tools That Replace a $200 Service Visit
You do not need a dealer’s tool chest. You need the right four items. A generic socket set gets you halfway, but the wrong driver strips the soft alloy screws common in headlight buckets. The wrong wrench over-torques a bezel and cracks a $300 housing.
The list is short because each tool does a specific job nothing else does well.
- A 3/16″ Allen Socket or T-Handle. This is for the trim ring and bucket screws on most Harley-Davidson models. A standard hex key will work in a pinch, but the socket gives you better mechanical advantage in tight spaces and reduces the chance of rounding the bolt head.
- A T-25 Torx Socket or Driver. Found in kits like the Custom Dynamics Shark Demon 2, this fastens the headlight bracket to the fairing. Using a Phillips head here is a guaranteed strip job.
- An In-Line Torque Wrench (¼” drive). This tool is required. Headlight screws are small and thread into plastic or thin metal. The Harley-Davidson bezel screw spec is 0.5–0.9 N·m (5–8 in-lbs), that’s finger-tight plus a gentle nudge. Guessing here costs you a new housing.
- A Digital Multimeter. Before you touch a wire, use it to verify the battery is disconnected. After installation, use it to check for voltage drop at the connector. A low voltage reading with the light on points to a bad ground or a charging system issue.
A torque wrench is not for show. Hit that with a standard ratchet and you’ll pull the threads straight out of the casting.
Skip the magnetic trays and the fancy pry bars. These four tools cover 95% of the mechanical and electrical verification for any job detailing how to install led headlights on a motorcycle. If your bike needs a special security Torx bit or a spanner wrench, the factory service manual will say so, and that manual is your first purchase if you’re doing anything more complex than a bulb swap.
The 7-Step Bump-Feed Replacement (and the One Step Nobody Skips)
This is the core physical swap for learning how to install led headlights on a motorcycle. The sequence matters because working out of order means taking things apart twice. We’ll use a common “bump-feed” style headlight bucket as the example, but the principles apply to most naked bikes and cruisers.
Step 1: Battery Disconnect.
Park on a flat surface, kickstand down. Turn the ignition off and remove the key. Disconnect the negative (-) battery cable first. Wrap the terminal in a rag so it cannot flop back and make contact. This is the step forums are full of riders admitting they skipped before seeing a spark.
Step 2: Remove the Trim Ring.
There’s usually one Phillips screw at the bottom or sides. Loosen it and the chrome or black ring will come free. Set it and the screw aside on a soft cloth. If your bike has a nacelle (like the Indian Scout Bobber), you’ll need to remove the six screws from the rear first.
Step 3: Pull the Headlight Assembly.
Unplug the electrical connector. It may have a press tab or a simple friction fit. Support the headlight with one hand while you disconnect it. Then, remove the screws or spring clips securing the bucket to the fork or mount. The whole assembly should come free.
Step 4: Disassemble the Old Assembly.
On a workbench, remove the screws or spring clips holding the old sealed beam or halogen bulb in the bucket. For LED conversions that reuse the bucket, you’ll now install the new LED unit into the old trim ring.
Step 5: Install the New LED.
Follow your kit’s instructions. For the Indian Scout LED kit, you align a tab on the light with a notch in the trim ring, then secure it with four spring clips. The Harley-Davidson 5-3/4” kit requires you to position the internal connector toward the lower right of the housing before the light will seat flat.
Common mistake: Forcing the connector. If the LED won’t sit flush, the wiring harness is likely jammed. Reposition it; don’t crank down the screws.
Step 6: Reinstall and Torque.
Feed the new connector through the bucket, seat the assembly back on the mount, and hand-tighten the mounting screws. Plug in the electrical connector. Now, reach for your torque wrench.
| Model (Example) | Fastener | Torque Specification |
|---|---|---|
| Indian Scout | Headlight Assembly Screw | 36 in. Lbs. (4 Nm) |
| Indian Scout Bobber | Headlight Assembly Screws | 73 in. Lbs. (8 Nm) |
| Harley-Davidson 5-3/4″ Kit | Bezel Screw | 0.5–0.9 N·m (5–8 in-lbs) |
| Harley-Davidson (Final) | Mounting Fasteners | 33.9–40.7 N·m (25–30 ft-lbs) |
Step 7: Reconnect the Battery.
Connect the positive (+) cable first, then the negative. This order minimizes the chance of a spark near the battery. Turn the key on and test the low and high beams before you even think about alignment.
The step everybody skips? Testing the lights before final torque and reassembly. Do not put the trim ring back on until you see both beams fire. If something is wrong, you have clear access to the connector.
Wiring: The Plug-and-Play Myth That Melts Harnesses
Most modern LED kits are plug-and-play.
Skipping an inline fuse means a short circuit could damage the wiring.
Here is the safe way to add power:
- Identify a Switched Power Source. Use your multimeter to find a wire that shows 12V only when the ignition is on. Use your multimeter to find a wire that shows 12V only when the ignition is on.
- Install a Relay. Connect the relay’s trigger terminals to that switched source. This uses a tiny current to control a much larger one.
- Run a Fused Direct Feed. Connect the relay’s load circuit directly to the battery positive via a fuse rated for your total accessory load. Run a fused direct feed from the battery to your accessories.
- Ground to the Frame. Ensure the ground connection is made to clean, bare metal on the frame. Do not ground to plastic or a painted bolt.
This setup isolates your new LEDs from the bike’s sensitive ECU wiring. It also allows you to turn everything off with the key, preventing a battery drain. For simpler bulb-only swaps, just ensure the OEM connector is clean and tight.
If you’re adding LED lights beyond the headlight, this relay method is mandatory.
The 25-Foot Wall Alignment You Cannot Guess
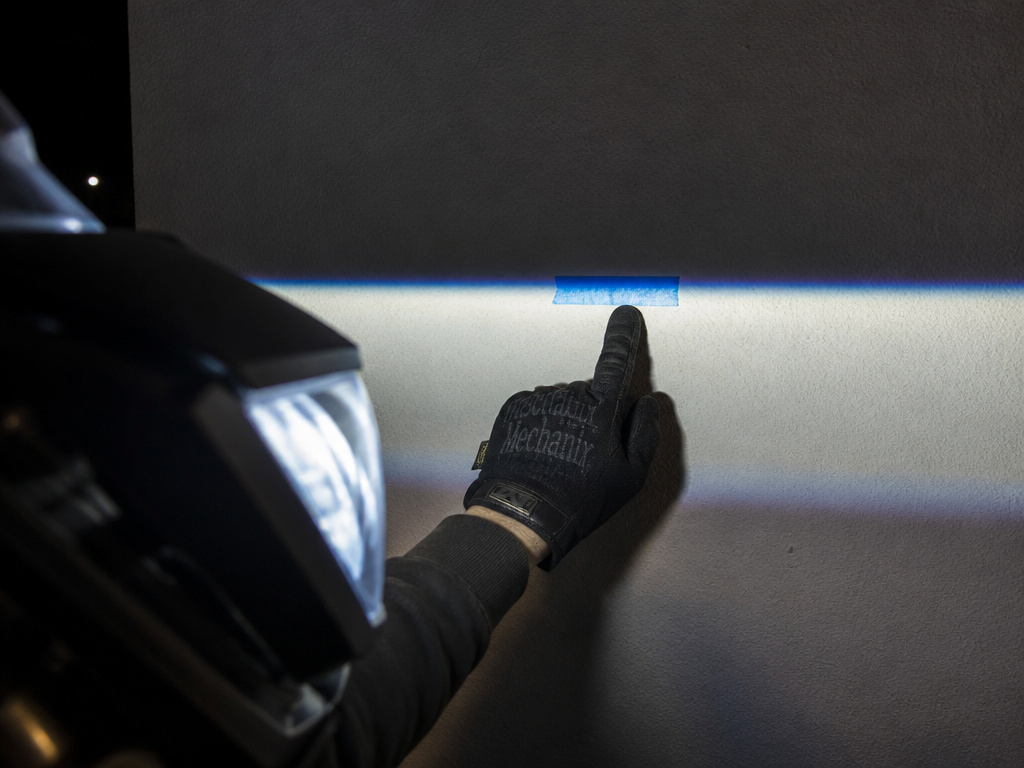
LED headlights have a different beam pattern than halogen. LED headlights have a different beam pattern than halogen headlights.
The Harley-Davidson service manual is explicit: “The alignment procedure for an LED headlamp is performed on both the low beam and the high beam.” Here is how to do it right.
Preparation:
- Check tire pressures.
- Fill the fuel tank or add equivalent ballast.
- Find a dark, flat wall and measure 25 feet (7.6 m) back. Mark this line.
Set-Up:
- Position the bike with the front axle on that 25-foot line.
- Have a person whose weight matches the principal rider sit on the motorcycle. Suspension sag changes the aim point.
- Point the front wheel straight at the wall.
- Measure from the floor to the center of the low beam lens. Mark this height on the wall with a horizontal line.
- Draw a vertical line down the wall, aligned with the bike’s centerline.
Alignment:
- High Beam (Left-to-Right): Turn on the high beam. Adjust the horizontal aim until the center of the high beam hot spot aligns with the intersection of your vertical and horizontal lines on the wall.
- Low Beam (Vertical): Switch to low beam. Adjust the vertical aim until the left side of the horizontal line of the low beam pattern aligns with the horizontal line on the wall.
This two-step process ensures the high beam throws far and centered, while the low beam is aimed low enough not to blind oncoming traffic. Once aligned, go back and fully torque the headlight mounting fasteners to the final specification, 33.9–40.7 N·m (25–30 ft-lbs) for that Harley kit.
Model-Specific Traps That Wreck a Weekend

Generic guides treat all bikes the same. Factory instructions do not. These edge cases will stop your project cold if you do not know about them.
Ambient Temperature Bonding (Harley-Davidson FLTR):
Installing the oval LED headlight kit on an FLTR Road Glide requires adhesive. The manual states the ambient temperature must be at least 16 °C (60 °F) for the adhesive to bond. The bond needs at least 24 hours before exposure to weather and reaches full strength after about 72 hours at room temperature. Try this in a cold garage and the bracket falls off at the first highway bump.
The Forbidden Cover:
For those same FLTR models, the manual is absolute: “The original equipment (OE) clear headlamp cover is not permitted over LED headlamps.” It must not be reinstalled. The LED’s heat output or optical design is incompatible. Putting it back on risks melting the cover or creating a lens effect that scatters the beam.
Required Conversion Kits:
Not all plugs are compatible. For 2014 and later Harley FLHR, FLHRC, and FLHRSE models, you need a specific conversion kit, Part No. 69200897. For 2006-2010 FLHTCUSE models, you need harness jumper Part No. 71628-04. Trying to force the standard plug to work will leave you with no light, or worse, damage the CAN bus system.
Before you buy any motorcycle headlight upgrade, dig for the OEM or manufacturer’s installation sheet.
Troubleshooting: Flickering, Hyperflash, and No Light
You followed the steps, but the light does not work. Do not panic. Electrical issues follow a logical path. Start with the simplest cause.
| Symptom | Likely Cause | First Check |
|---|---|---|
| No power (both beams dead) | Blown fuse, bad ground, disconnected battery | Check the main fuse and headlight circuit fuse with a multimeter. |
| Flickering at idle | Under-voltage, poor connection | Test voltage at the LED connector with the engine running. Should be >13V. |
| Hyperflash (turn signals) | Incorrect load for flasher relay | Install an LED-compatible electronic flasher relay or load resistors. |
| One beam dead (low or high) | Faulty LED module, wiring issue in switch | Swap the high/low beam wires at the connector to test the switch. |
The most common fix for a “no light” situation is the ground. Find where your headlight ground wire attaches to the frame. Remove the bolt, sand the contact area on the frame and the terminal to bare metal, and reconnect. Over half of mysterious electrical problems are bad grounds.
For flickering, the issue is often a dying battery or a weak stator that cannot keep up with the electrical load at idle. If the voltage at the battery drops below 12.5V with the light on, your charging system needs inspection.
How to choose the right LED headlight size and fit
Start by knowing your motorcycle’s exact model and year. A headlight that fits a standard Indian Scout may not fit a Scout Bobber, and a Harley-Davidson FLTR model has different requirements than an FLHR. Some models, like certain Harley touring bikes from 2014 onward or specific 2006-2010 models, require a dedicated conversion kit or a special wiring harness jumper for proper function. Always check for a note that the LED unit complies with SAE and DOT standards for road use. The physical mounting system is critical; ensure the new light’s housing, tabs, and slots match your bike’s headlight bucket and retainer ring.
Should you wire an LED headlight to the battery or a switched circuit
Always connect your new headlight to a switched power circuit, not directly to the battery. A switched circuit turns the light on and off with the ignition key, preventing a dead battery. Before making any electrical connection, disconnect the negative battery cable first to prevent shorts or sparks. When you are finished, reconnect the positive battery cable first. For bikes with a security system, verify the hands-free fob is present and turn the ignition key to the IGNITION position during reconnection to avoid triggering an alarm. Never reinstall the main fuse until the key is confirmed to be in the OFF position.
Frequently Asked Questions
Can I just replace the bulb with an LED?
Sometimes. Some motorcycles with replaceable halogen bulbs may accept an LED bulb replacement, but compatibility must be verified. However, you must ensure it fits within the housing depth and that the cooling fan (if present) has clearance. The beam pattern may also be suboptimal compared to a dedicated LED reflector/optic.
Are LED headlights legal?
LED headlights that comply with SAE and DOT standards are legal for road use in the United States. The Custom Dynamics Shark Demon 2, for example, carries these certifications. Always check your local regulations, as some areas have specific rules about headlight color temperature or beam pattern.
Why do I need to align the headlight?
Proper alignment is a safety and legal necessity. A misaligned headlight reduces your visible distance at night and can blind oncoming drivers, creating a hazard. Proper headlight alignment is a common safety and legal requirement.
Do I need a load resistor for my LED headlight?
Usually not for the headlight itself. Load resistors are typically needed for LED turn signals to correct hyperflashing, because LEDs draw less current than the stock flasher relay expects.
How long do LED motorcycle headlights last?
Quality LED headlight typically lasts much longer than a halogen bulb.
The Bottom Line
If you only remember one thing: torque values and alignment are not optional. The 73 in. Lbs. for an Indian Scout Bobber and the 25-foot loaded alignment are there because engineers tested what keeps the light sealed and aimed. Guessing these steps turns a simple upgrade into a safety issue.
Before you order, download the installation sheet for your specific bike and kit. If it mentions a required conversion harness or a temperature-sensitive adhesive, believe it. That sheet is the difference between a two-hour job and a two-week parts wait. Then, take your time. Hand-start every bolt, use the torque wrench, and test the beam on a wall. The road will be darker without it.
