
How to Adjust a Motorcycle Clutch Cable: Step-by-Step
This post contains affiliate links. As an Amazon Associate, we earn from qualifying purchases.
Adjusting a motorcycle clutch cable means setting a precise gap, called free play, between the clutch lever and its perch, then tightening the adjuster lock nuts to the correct torque. For specific models like the Indian FTR, aim for 0.5 to 1.5 mm measured at the lever-perch gap, while the Indian Chieftain specifies 0.5 to 1.55 mm. A general article cites 3mm to 5mm as a typical manufacturer range for the lever-perch method. Use the handlebar barrel adjuster for fine-tuning; use the lower cable adjuster near the engine for major changes, and always torque the lock nut to prevent slippage.
That spec is not a suggestion. A cable set too tight drags the clutch plates, which heats the oil and wears the basket. Set too loose, the clutch never fully engages, which slips under load and glazes the plates. The difference between a crisp shift and a toasted transmission lives in that millimeter, which is why knowing how to adjust a motorcycle clutch cable is critical.
What follows: the right way to measure free play (and why your manual might be wrong), the specific torque specs for Harley-Davidson and Indian models, the one adjustment mistake that cracks cable housings, and how to test your work so the bike doesn’t lurch when you fire it up.
Key Takeaways
- Measure clutch lever free play at the gap between the lever and perch, not at the lever tip. Aftermarket or bent levers make the lever-tip method unreliable.
- For major adjustment, always loosen and re-torque the lower cable adjuster lock nut. The Indian FTR requires 48 in-lbs (5.4 Nm); a Harley jamnut needs 120 in-lbs (13.6 Nm).
- Lubrication advice varies. Indian Motorcycle says to apply a thin coating of all-purpose grease to both clutch cable ends and not to lubricate between the cable and sheath. Harley-Davidson specifies applying a light coat of clean engine oil on the new O-ring before installing it onto the threaded portion of the clutch cable end.
- Support the cable when threading it into the clutch cover. Side-loading the fitting can strip the aluminum threads, which is not a warranty repair.
- After adjustment, verify the engine will not start in gear with the clutch lever out. If it does, the cable is still too loose.
What “Free Play” Actually Means (And Why It’s Non-Negotiable)
Clutch plates wear. As the friction material thins, the clutch stack shrinks. The cable must take up that slack to keep the release mechanism in the same starting position. Free play is the designed-in cable slack that ensures the clutch is fully engaged when your hand is off the lever.
Clutch lever free play is the measured gap between the lever and its mounting bracket (the perch) before the cable becomes taut. This slack allows for clutch wear and thermal expansion, ensuring full engagement and preventing drag.
Without it, the clutch is partially disengaged even with the lever released. You get drag, heat, and accelerated wear. Too much free play, and the clutch never fully releases, you get slippage under power. The factory spec is a narrow window for a reason.
Where most riders get this wrong is the measurement point. Many owner’s manuals, like the one for the CSC RX3, specify measuring at the lever tip (e.g., 1/4 to 1/2 inch of movement). The Harley-Davidson and Indian Motorcycle technical service bulletins (TSBs) specify measuring at the lever-perch gap. The Motorcycle.com tutorial calls the lever-tip method “potentially flawed.”
Why? Aftermarket levers have different shapes. A bent stock lever changes the geometry. The lever-perch gap stays constant regardless of lever type, which is why it’s the mechanic’s choice. Trust the gap, not the arc.
The Two Ways to Measure Free Play (And The Right One)
You have two candidate spots. Only one is reliable if your levers aren’t perfect.
The Lever-Tip Method: Measure how far the end of the lever moves before you feel cable resistance. General articles often cite 10–20 mm as a typical range. This is easy but fragile. An aftermarket shorty lever cuts that distance in half. A bent lever makes it inconsistent. If you have pristine, stock levers, it’s serviceable. Most of us don’t.
The Lever-Perch Gap Method: Measure the air gap between the lever and the perch mounting bracket with a feeler gauge or calipers. This is the spec used in official service documents.
| Motorcycle Model | Free Play Spec (Lever-Perch Gap) | Source |
|---|---|---|
| Indian FTR (2019-2024) | 0.5 to 1.5 mm (0.019 to 0.059 in) | NHTSA TSB MC-11014761-0001 |
| Indian Chieftain (2014+) | 0.5 to 1.55 mm (0.02 to 0.059 in) | NHTSA TSB MC-11016279-0001 |
| General Target | 1–2 mm (0.04–0.08 in) | Common mechanic recommendation |
The process is simple. Pull the lever gently until you feel the cable go taut. That initial movement is the free play. Use a feeler gauge of the correct size for your motorcycle’s specification to check the gap, a fundamental step in how to adjust a motorcycle clutch cable.
Aim for a value within the specified range for your motorcycle. Clutch wear will push it toward the wider end over time. Start tight, let it loosen.
Tools and Safety: What You Actually Need
You don’t need a full shop. You do need the right wrenches and a torque wrench. Guessing on the lock nut torque is how cables come loose mid-ride.
Basic Toolkit:
- Wrenches: Size depends on your bike. For an Indian Chieftain, you need a 13mm wrench for the adjuster and a 14mm wrench for the lock nut, per the NHTSA bulletin. For a Harley, you need two 7/16-inch wrenches.
- Torque Wrench: In/lb capacity for small fasteners. Critical for the lock nut.
- Feeler Gauges or Digital Calipers: For measuring the lever-perch gap.
- All-Purpose Grease: For lubricating cable ends.
- Shop Rags & Nitrile Gloves: Indian’s TSB explicitly calls for safety glasses and nitrile gloves.
Before you start: Park on a flat, level surface and let the engine cool completely. Disconnect the battery (negative cable first) if your adjustment requires removing the cable from the lever. An accidental start with the cable detached can cause the bike to lurch.
If you’re just tweaking the barrel adjuster at the lever, you can skip the battery disconnect, a key safety note when learning how to adjust a motorcycle clutch cable. Any time you’re disconnecting the cable at the lever or engine, kill the power.
Step-by-Step Cable Adjustment
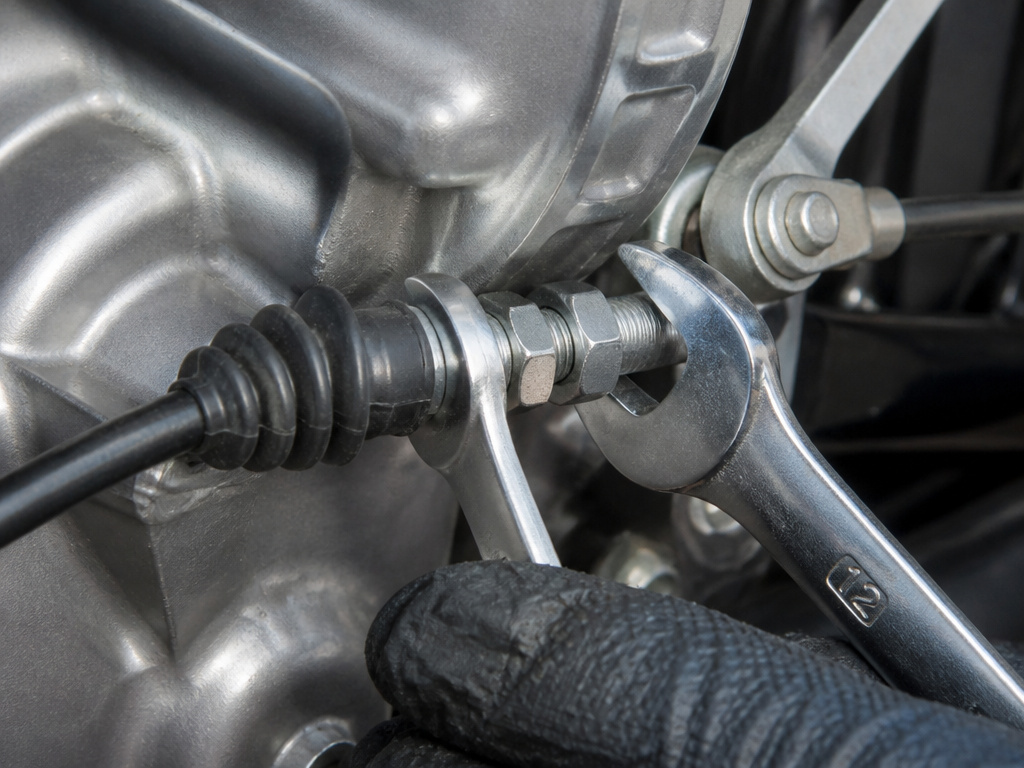
This is a two-stage process: fine-tune at the handlebar, major adjust at the engine. Always start with the barrel adjuster wound most of the way in (clockwise) to give yourself adjustment room.
Step 1: Fine-Tune with the Barrel Adjuster.
Locate the knurled plastic or metal barrel where the cable meets the clutch perch. Turn it counterclockwise to increase free play (loosen the cable). Turn it clockwise to decrease free play (tighten the cable). Do this with the lock nut on the barrel loosened. After setting, hold the adjuster and tighten the lock nut snugly by hand. This is for minor, seasonal tweaks.
Step 2: Major Adjustment at the Lower Cable.
If the barrel adjuster runs out of threads, you need to use the primary adjuster near the engine or transmission.
- Locate the lower adjuster assembly. It’s usually on the cable run near the primary cover or engine case. Slide back any rubber dust boot.
- Hold the cable adjuster with one wrench (e.g., 13mm). Loosen the lock nut with another (e.g., 14mm).
- Turn the cable adjuster. The rule is: turn the adjuster inward (clockwise) to decrease free play (tighten). Turn it outward (counterclockwise) to increase free play (loosen). Make small turns, a quarter-turn changes the free play noticeably.
- Check the lever-perch gap after each adjustment.
- Torque the lock nut. This step is mandatory. Vibration will walk a hand-tight nut loose. For a 2019-2024 Indian FTR, the official NHTSA technical service bulletin for FTR specifies 48 in-lbs (5.4 Nm). For a Harley-Davidson jamnut at the lever-side adjuster, the service manual calls for 120 in-lbs (13.6 Nm).
Common mistake: Twisting the clutch lever side of the adjuster instead of the transmission end. The Harley-Davidson manual warns that twisting the clutch lever side of the adjuster “could result in damage to the outer jacket of the clutch cable.” Hold the lever-side of the adjuster with one wrench while using the other wrench to rotate the transmission end of the adjuster.
Step 3: Final Check and Test.
With the bike still on its stand, pull the clutch lever. The action should be smooth, with a distinct point where the cable goes taut. Roll the bike backward in gear with the clutch pulled in; it should move freely without dragging. Now for the critical test: put the bike in gear, pull the clutch lever all the way to the bar, and hit the starter. The engine should not turn over. If it cranks or the bike lurches, your cable is still too loose. Shut it off and re-adjust.
Brand-Specific Notes and Torque Values
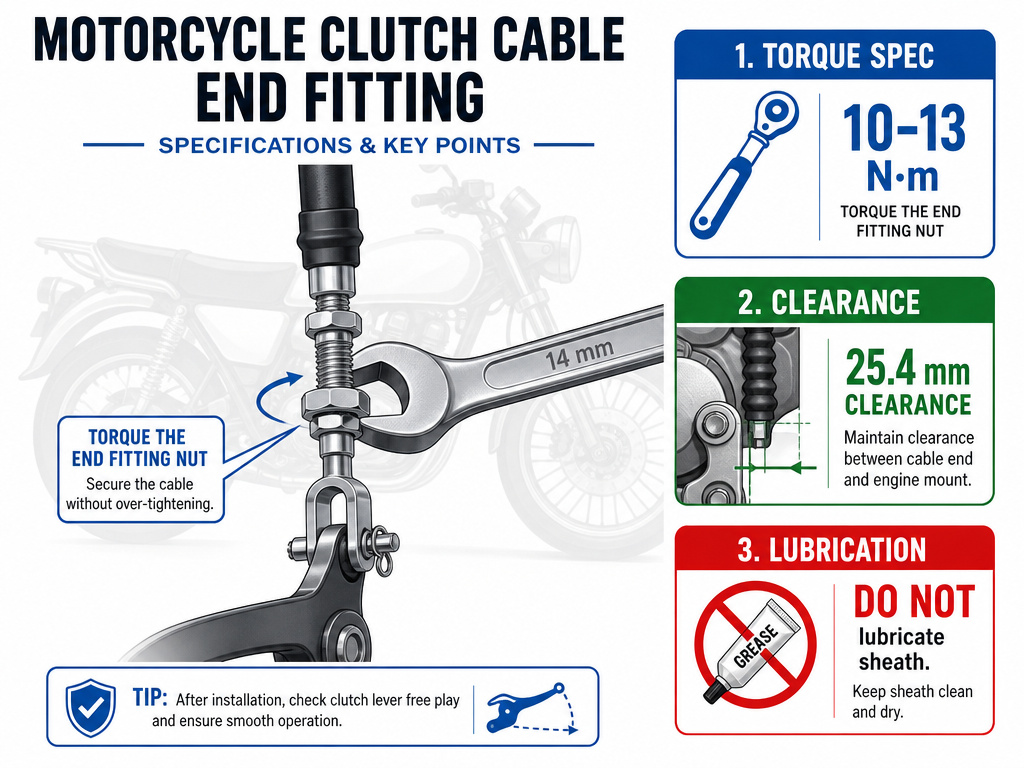
Generic advice gets you close. Factory specs get it right. Here are the hard numbers from the service documents.
Harley-Davidson Highlights:
- Clutch Cable End Fitting Torque: 10–13 N·m (90–120 in-lbs). The manual explicitly warns: “Do not over-tighten clutch cable threaded end fitting.”
- Cable Routing Clearance: On 2006-2017 Dyna models, maintain approximately 25.4 mm (1.0 in) clearance between the cable and the front engine mount.
- Cable Length Check: If a replacement cable is more than 2 inches longer or 1 inch shorter than needed, see a dealer. An incorrect length “can adversely affect motorcycle operation.”
Indian Motorcycle Highlights:
- Lubrication Protocol: “Apply a thin coating of all-purpose grease to both clutch cable ends. DO NOT lubricate between the cable and sheath.” This contradicts the old spray-lube habit.
- Full Inspection: Before adjusting, inspect the entire cable for casing damage and exposed wire for “fraying, kinks or corrosion. Replace any cables that are damaged, sticky or sluggish.”
- Lower Cable Guide Torque (Chieftain): The fastener that holds the cable guide needs 84 in-lbs (9 Nm), per the NHTSA bulletin for Chieftain clutch.
These aren’t just good ideas. They are the documented procedures that, if ignored, can lead to a denied warranty claim on a damaged part.
Lubrication, Inspection, and When to Replace
Adjustment is maintenance. Inspection is prevention.
What to Lubricate (and What Not To):
- Do: Grease the ball ends of the cable where they sit in the lever and actuator arm. Grease the clutch lever pivot pin.
- Do Not: Spray any lubricant into the cable sheath. The sheath has a plastic liner; grease or oil there attracts abrasive dust and turns into grinding paste. It also washes out the factory anti-corrosion treatment.
Inspection Checklist:
- Visual: Follow the cable from lever to engine. Look for cracks, tears, or swelling in the outer sheath.
- Fraying: At each end, check where the inner wire exits the sheath. Any broken wire strands mean replace it now.
- Feel: Operate the lever. The action should be light and smooth. Any grit, stickiness, or binding means internal corrosion. A new cable is cheaper than a clutch pack.
A cable is a wear item. If you’ve maxed out both adjusters and still have too much free play, the cable has stretched or the clutch is severely worn. Time for a new cable. When routing a new one, avoid sharp bends and ensure it doesn’t contact hot or moving parts. A proper motorcycle clutch is only as good as the cable that controls it.
Troubleshooting: Signs You Adjusted It Wrong
The proof is in the ride. Here’s how to diagnose a bad adjustment.
Symptom: Clutch Drag.
- Feels Like: Bike wants to creep forward when in gear with the clutch pulled in. Shifting into first gear produces a loud clunk.
- Cause: Cable too tight. Not enough free play, so the clutch is never fully released.
- Fix: Increase free play (turn lower adjuster counterclockwise).
Symptom: Clutch Slipping.
- Feels Like: Engine RPMs rise without a corresponding increase in speed, especially under hard acceleration or uphill.
- Cause: Cable too loose. Too much free play, so the clutch never fully engages.
- Fix: Decrease free play (turn lower adjuster clockwise). If adjustment doesn’t fix it, the clutch plates may be worn.
Symptom: Inconsistent Lever Feel.
- Feels Like: Free play changes on its own from one pull to the next.
- Cause: Loose lock nut at the lower adjuster. It’s backing off with vibration.
- Fix: Loosen, re-adjust, and torque the lock nut to the proper spec. This is why a torque wrench matters.
Mastering shifting gears smoothly depends on a consistently adjusted clutch. If your adjustments are fighting you, the cable might be failing internally.
Harley-Davidson and Indian Clutch Cable Details
Harley-Davidson and Indian provide specific torque values for critical fasteners. For Harley models, the clutch cable end fitting requires a torque of 10–13 N·m, and the jamnut at the lever-side adjuster needs 13.6 N·m. Use two 7/16-inch wrenches to adjust, holding the lever-side adjuster while turning the transmission end to avoid damaging the cable jacket. On Indian FTR and Chieftain models, the clutch cable adjuster lock nut should be torqued to 48 in-lbs. Their free play specification, measured at the gap between the lever and its mounting bracket, is notably small at 0.5 to 1.5 mm. Always consult your specific service manual for exact figures, as these details can vary between models and model years.
Frequently Asked Questions
Can I adjust the clutch cable without any tools?
You can make minor adjustments using only the barrel adjuster at the clutch perch by hand. However, for any major adjustment at the lower cable, you need wrenches to loosen the lock nut and a torque wrench to secure it properly. Hand-tight is not enough, it will vibrate loose.
How often should I check my clutch cable free play?
Check it every time you change the oil, or at least every 2,000 miles. Cable stretch and clutch wear happen gradually. A quick lever-perch gap check takes 30 seconds and can save you from a slipping clutch on your next ride.
What’s the difference between adjusting a cable clutch and a hydraulic clutch?
Hydraulic clutch uses fluid and a master/slave cylinder, so it self-adjusts for wear. You don’t adjust free play; you bleed the system to remove air. If a hydraulic clutch feels loose, the issue is usually air in the line or worn components, not a simple cable adjustment.
My adjusters are maxed out but the clutch still slips. Now what?
You’ve run out of adjustment range. This means the cable has stretched beyond its service limit or, more likely, the clutch friction plates are worn out. The next step is to replace the clutch cable and/or inspect the clutch pack for wear.
Is it okay to use WD-40 on my clutch cable?
No. WD-40 is a water displacer and light solvent, not a lubricant. It will temporarily free a sticky cable but will then dry out, leaving the cable unprotected and potentially washing away protective grease. Use all-purpose grease on the cable ends only, as specified by Indian Motorcycle’s procedure.
Before You Go
One rule that reframes this whole task: free play isn’t a preference. It’s a clearance spec, like valve lash. Set it to the factory lever-perch gap with a feeler gauge, torque the lock nuts to the manual’s spec, and test that the bike won’t start in gear. That sequence works on a 1980 UJM or a 2025 Indian Scout.
If your lever feels notchy even after adjustment, the pivot likely needs cleaning and grease, a five-minute job that changes the entire feel of the clutch levers. And if you’re ever unsure, the official government-hosted service bulletins from NHTSA are free to download. They are the ultimate backstop against bad forum advice. Trust the document, not the anecdote.
