
Motorcycle Boot Shift Pad Explained: How to Choose
This post contains affiliate links. As an Amazon Associate, we earn from qualifying purchases.
A motorcycle boot shift pad is a protective patch, usually rubber or neoprene, that attaches to the toe of your right boot. Its job is simple: absorb the friction and wear from repeatedly operating the gear shift lever, preventing premature damage to the boot’s outer material and providing a consistent, grippy contact point.
That definition covers the what. The when is the real question. Is it a must-have for every rider, or a niche accessory for specific boots and riding styles? The function of a motorcycle boot shift pad explained is to protect the boot from wear.
What follows: a breakdown of the pad’s materials and attachment, a clear guide on when it’s actually worth adding, and the one adjustment rule that prevents transmission damage, straight from OEM service manuals.
Key Takeaways
- A shift pad is a wear item, not a performance mod. Its sole purpose is to protect your boot’s toe.
- You only need one if your boot lacks a built-in slider or the existing toe material is soft leather or suede that shows rapid wear.
- Correct placement is critical. A pad mounted too high or too low changes the shifter’s mechanical advantage and can lead to missed shifts.
- Clean it with mild soap and water. Harsh chemicals degrade the adhesive and the pad material over time.
- For boots with integrated, replaceable toe sliders, skip the pad. The slider is the superior, serviceable solution.
What Is a Motorcycle Boot Shift Pad?
Look at the toe of your right riding boot. That’s the spot that rubs against the shift lever peg every time you change gear. Do it a few thousand times, and even tough leather starts to polish, then scuff, then wear through.
A shift pad is a buffer. It’s a piece of material, typically dense rubber, neoprene, or a reinforced polymer, that you stick or strap onto that contact zone. It sacrifices itself so your boot doesn’t have to.
The shift pad is a consumable friction interface. It turns boot damage into pad wear, which is cheaper and easier to replace.
Think of it like a screen protector for your phone, but for your boot. The principle is the same, as the motorcycle boot shift pad explained: let a cheap, replaceable part take the abuse that would otherwise ruin the expensive primary item.
How it attaches: Almost universally with adhesive. You peel a backing and stick it on. Some versions include a Velcro strap that wraps around the boot’s toe for a more secure hold, which is useful for bulkier adventure boots. The adhesive types are cleaner and lower profile, ideal for street boots.
What it’s made of: The rubber versions are most common. They offer good grip and durability. Neoprene pads are softer and more flexible, better for conforming to odd shapes but they wear faster. You’ll also find synthetic “gripper” materials with textured surfaces designed to hold the shift peg firmly.
When Do You Actually Need a Shift Pad?
Not every boot needs one. In fact, adding one to the wrong boot can be a waste of money and even a slight nuisance.
You need a shift pad if your boot meets two conditions:
- The toe lacks any dedicated, reinforced protection.
- The toe material is showing wear after your first few rides.
That means classic leather cruiser boots, some vintage-style boots, and many fashion-oriented “riding” boots are prime candidates. The leather is often soft and finishes beautifully, but it isn’t built to handle constant abrasion from a metal peg.
You do not need a shift pad if your boot has a built-in toe slider. Most modern sport, touring, and adventure boots have this. It’s a hard plastic or reinforced rubber panel, often replaceable, that’s molded into the boot’s design. A Sidi boot’s toe slider or an Alpinestars panel is doing the job a stick-on pad would, but better. Adding a pad on top is redundant and can feel clumsy.
Common mistake: Putting a pad over a boot’s existing hard toe slider. You add bulk, reduce feel, and gain zero extra protection.
There’s a middle ground: the boot with a moderately tough toe but no defined slider. Many street boots and commuter models live here. The synthetic material might hold up for a season or two before wearing through. A pad here is a proactive move. It extends the boot’s life for a few dollars, which is a solid trade.
How a Shift Pad Affects Your Shifting Feel
This is the part most product listings skip. A pad changes the interface between your foot and the lever.
A bare leather toe on a metal peg is a low-friction, direct connection. You feel the lever’s movement immediately. A rubber pad adds damping. It’s grippier and slightly cushioned. For some riders, that’s an improvement, it feels more positive and can mute vibrations. For others, it feels vague, like there’s a layer of foam between you and the machine.
The thickness matters more than you’d think. A 3mm thick pad raises your effective foot position by, well, 3mm. That changes the lever’s geometry relative to your ankle. It’s a tiny change, but over a long ride, it can alter your shifting motion enough to cause fatigue or even lead to missed shifts if you’re not used to it.
This is why placement is critical. The pad must sit exactly where your boot already contacts the peg. If you stick it an inch higher because “it looks right,” you’ve effectively moved the lever’s pivot point. Your foot will travel farther to complete a shift, or it might not travel far enough to fully engage the gear.
| Boot Type | Need a Pad? | Why or Why Not |
|---|---|---|
| Sport / Race Boot (Sidi, Alpinestars) | No | Has a hard, replaceable toe slider as part of its design. |
| Touring Boot (many TCX models) | Maybe | Often has a reinforced toe; pad is insurance against long-term wear. |
| Adventure Boot | Maybe | Toe is usually armored; a strap-on pad can help if the shape doesn’t match the lever well. |
| Classic Leather Boot | Yes | Soft leather will shred without a protective layer. |
| Fashion/”Rider” Boot | Yes | Prioritizes looks over abrasion resistance. |
The feel difference is most pronounced in precise, quick shifting like you’d do on a sportbike. On a cruiser or adventure bike where shifts are more deliberate, the motorcycle boot shift pad explained that the pad’s damping might be welcome.
Installation and Fit: Getting It Right

You have the pad. Your boot is clean and dry. Now comes the only tricky part: positioning.
Step 1: Find the exact contact point. Don’t guess. Sit on your bike in your riding position. Have a friend mark the spot on your boot toe that touches the shift peg with a piece of chalk or a dry-erase marker. That mark is your bullseye.
Step 2: Prep the surface. Wipe the boot toe with isopropyl alcohol to remove any oils, wax, or dirt. Let it dry completely. This ensures the adhesive bonds properly.
Step 3: Apply the pad. Align the pad’s center with your mark. Peel the backing slowly and press the pad down firmly, working from the center out to avoid air bubbles. Apply pressure for 30 seconds.
Step 4: Let it cure. Don’t ride immediately. Let the adhesive set for at least a few hours, ideally overnight. This gives the bond its best chance to hold.
Where this goes sideways: Installing the pad at room temperature, then riding in cold weather. The adhesive becomes brittle and the pad can peel off on the first chilly morning ride. If you’re installing in winter, warm the boot toe with a hairdryer first to help the adhesive flow.
For strap-on models, the process is simpler but fit is key. The strap must be snug enough not to shift, but not so tight it distorts the boot’s shape or cuts off circulation. The pad itself should sit flat against the toe without wrinkles.
What if it’s crooked? Peel it off carefully and try again. Most adhesive pads allow one careful repositioning. After that, the adhesive loses strength. It’s better to get it right the first time.
Maintenance, Cleaning, and When to Replace
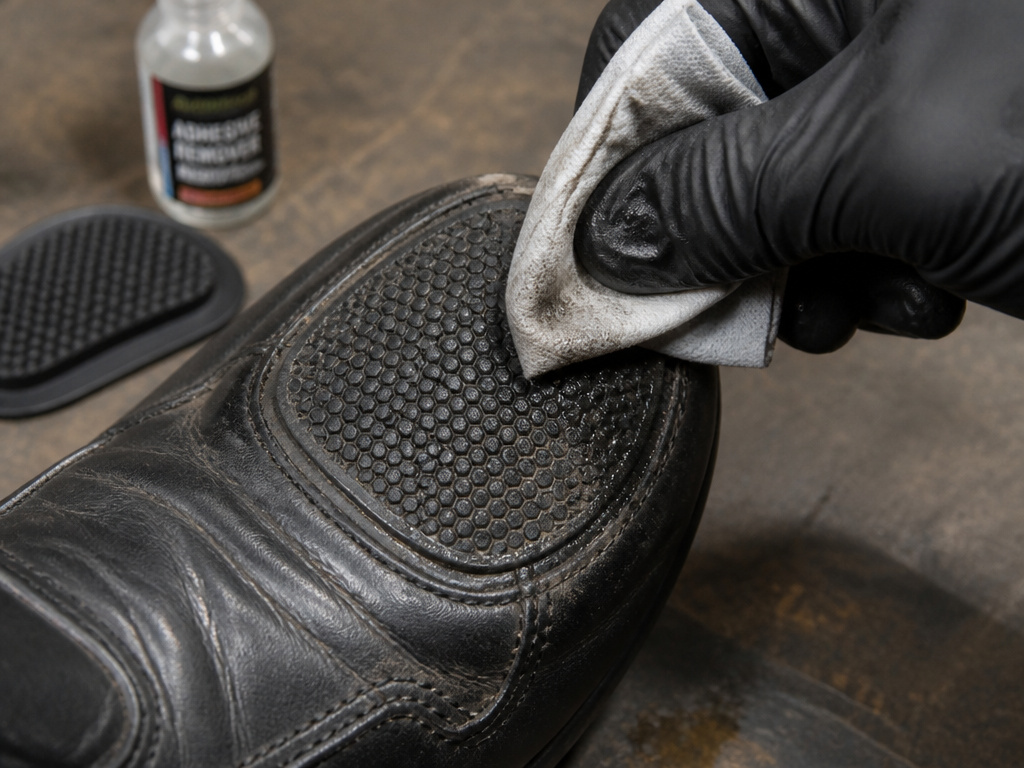
A shift pad isn’t a “install and forget” item. It’s a wear part.
Cleaning: Dirt and road grime embed into the pad’s surface. This turns it into sandpaper, accelerating wear on both the pad and your shift peg. Clean it regularly with a damp cloth and mild soap. Avoid harsh solvents like brake cleaner or gasoline, which will break down the rubber and the adhesive.
Inspection: Every few rides, give it a look. Is it peeling at the edges? Is the surface becoming smooth and polished? Deep grooves mean it’s doing its job, but it’s also nearing the end of its life.
Replacement timeline: There is no fixed mileage. It depends on your riding frequency, pad material, and even your shifting force. A heavy-footed rider on a stiff-shifting bike might wear out a rubber pad relatively quickly. A light touch on a smooth gearbox could make a pad last significantly longer. When the pad is visibly thin, cracked, or losing adhesion, swap it.
Replacing it is the same as the first installation. Clean the old adhesive residue off the boot thoroughly with adhesive remover before applying the new one.
The OEM Perspective: Why Lever Position Matters
While the pad itself is an afterthought for manufacturers, the position of your foot on the shift lever is not. It’s a safety and durability issue documented in official service manuals.
Both Harley-Davidson and Indian Motorcycle (Polaris) manuals contain specific warnings and procedures for shift lever adjustment. The reason is mechanical, not comfort.
Worth knowing before you start: “Do not allow the shift lever to contact the support bracket when shifting, as this prevents proper gear engagement and may damage the transmission.”. Harley-Davidson Service Instruction Sheet.
If your shift lever or peg hits the footboard, frame, or any other part before the transmission completes its shift, you get a false neutral or a partial engagement. That causes clunking, grinding, and over time, internal damage.
This is where a thick shift pad becomes a problem. If your pad is too thick, or if you’ve adjusted the lever for a different boot and then add a pad, you might inadvertently reduce the available lever travel. The lever hits its mechanical stop before the shift is complete.
The factory fix is adjustment. For example, Polaris (Indian Motorcycle) instructions for its Driver Foot Controls Kit specify: after installing the shift arm on the transmission spline, you must “cycle the shift pedal to ensure there is no interference between any parts when shifting.” A Harley-Davidson Mid-Control Kit instruction sheet says to adjust the shifter rod if “full gear engagement or full lever travel is not achieved.”
The lesson for the rider: after installing new boots or a new shift pad, test your shifting at a standstill. Make sure the lever has clear, unimpeded travel through its entire range. If it binds or contacts anything, you need to adjust the lever position, not just live with it.
Where to Buy a Shift Pad
Shift pads are common aftermarket accessories. You can find them at motorcycle parts retailers, both online and in physical stores. Shift pads are common aftermarket accessories. You can find them at motorcycle parts retailers, both online and in physical stores. When shopping, focus on the material and attachment method. Some pads use strong adhesive backing, while others employ straps or sleeves. Choose one that seems durable and suits your boot’s shape. Since installation is typically a simple peel-and-stick process, you won’t need special tools or a technician to fit one to your existing lever.
Frequently Asked Questions
Can a shift pad damage my boots?
Good quality pad with proper adhesive will not damage the boot’s material. The risk comes from removal. Pulling off an old pad hastily can tear the boot’s outer layer or leave stubborn glue residue. Use a plastic pry tool and adhesive remover for clean removal.
Are shift pads universal fit?
Most are “one-size-fits-most,” designed for an average boot toe. They work well on standard shapes. Boots with extremely curved, square, or oversized toes might not get full coverage, leaving edges exposed to wear. Measure your toe’s contact area before buying.
How does it compare to a built-in toe slider?
The built-in slider wins. It’s integrated into the boot’s protective structure, often replaceable with a simple screw, and designed for maximum abrasion resistance. A stick-on pad is a retrofit solution for boots that lack this feature. Think of the slider as the factory option and the pad as the aftermarket fix.
Can I make my own shift pad?
You can, but it’s rarely worth the effort. Cutting a piece of rubber or grip tape and gluing it on might work temporarily, but the adhesive usually fails under heat, moisture, and constant flexing. Commercial pads use formulated adhesives and materials tested for this specific job.
Do I need one on my left boot for the rear brake?
Almost never. Brake pedal action is different. You’re pressing down, not hooking and lifting. The contact is more of a press than a scrape, and it’s far less frequent. Wear on the left boot toe is minimal compared to the right.
Before You Go
Here’s the honest take. A shift pad is a $15 solution to a $200 problem. If you’re wearing through the toe of a nice pair of boots, it’s a no-brainer.
But first, check your boots. If they already have a hard toe panel or slider, you’re covered. Save the money. If they’re soft leather and you see that shiny spot forming after a month of riding, get the pad. Stick it on precisely, let it cure, and forget about it until it wears thin.
One rule from the OEM manuals that applies directly: after any change to your boot or lever, check for full, unobstructed lever travel. A missed shift is annoying; transmission damage from constant interference is expensive. That’s the one mechanical stake that makes this small accessory worth thinking about.
