
Compression vs Rebound Damping on a Motorcycle
This post contains affiliate links. As an Amazon Associate, we earn from qualifying purchases.
Compression damping controls how easily the suspension compresses over a bump, while rebound damping controls how fast it returns after compression. Get compression wrong and the bike feels unstable or harsh; get rebound wrong and it turns into a pogo stick or packs down. The goal is to keep the tire glued to the pavement, compression decides initial contact, rebound decides the follow-through.
That gap between compression and rebound is where the bike’s whole personality lives. One handles the hit, the other handles the recovery. Understanding compression vs rebound damping on a motorcycle is key. Setting both correctly turns a twitchy ride into a planted one, whether you’re on a Harley bagger or a sportbike.
What follows: the mechanical difference between the two, what they physically do to your ride, how to find and adjust the clickers, and the one-step-at-a-time method to stop chasing your tail.
Key Takeaways
- Öhlins recommends starting tuning with rebound damping, while the MC Tuning Guide advises starting with compression adjustments.
- For street riding, follow your specific manufacturer’s instructions: Harley-Davidson uses the maximum stop as zero, while Öhlins and K-Tech use the fully closed position.
- Change only one adjuster at a time. Öhlins recommends fine-tuning one click at a time, while another Öhlins guide suggests two clicks at a time after initial larger changes. Changing three things at once teaches you nothing except that you made it worse.
- In low-grip conditions (rain), less low-speed damping delays tire loading for more traction. In high-grip conditions (dry), more damping loads the tire sooner for stability.
- Too little rebound feels like a pogo stick over repeated bumps; too much packs down and gets harsh by the third or fourth bump.
Compression vs Rebound Damping: The Mechanical Difference
Compression and rebound damping work the same valve and piston, just in opposite directions. When the wheel hits a bump, the shock shaft moves into the body. Oil above the piston is pressurized and must flow through the compression adjuster bleed valve and shim stack into the reservoir. That flow restriction creates compression damping force.
When the spring pushes back, the shock extends. Now, oil below the piston is pressurized and must flow through the rebound adjuster bleed valve and shim stack. That restriction creates rebound damping force.
Compression damping controls the energy absorption when the shock absorber is being compressed, thus controls how easy the shock absorber compresses when you hit a bump. Rebound damping controls the energy absorption when the shock absorber is being extended and, thus controls how fast the shock absorber returns to its normal position after being compressed. , Öhlins DTC Bedienungsanleitung
Think of it this way: compression is the shock absorbing the bump; rebound is the shock controlling the spring’s release. A motorcycle with balanced compression and rebound damping keeps the wheel in contact with the road. An unbalanced setup causes the wheel to hop or skate.
What Does Compression Damping Control?
Compression damping decides how much the suspension resists being compressed. It affects initial bump impact, chassis attitude under braking or acceleration, and overall grip.
Öhlins states: if the vehicle feels unstable, soft, low, or is bottoming, increase compression damping. If it feels harsh, hard, or has bad grip, decrease compression damping.
High-performance shocks often split this into high-speed and low-speed circuits. Öhlins states that low-speed compression adjuster affects ride height, smoothness over small bumps, and grip. High-speed compression adjuster affects stability, firmness in depressions, and fast corners.
Symptoms of Too Much or Too Little Compression
| Symptom | Likely Cause | Manufacturer’s Recommended Fix (Öhlins) |
|---|---|---|
| Bike feels soft, unstable, bottoms | Too little compression | Increase low-speed compression by 4 clicks |
| Harsh over small bumps, poor grip | Too much low-speed compression | Decrease low-speed compression by 4 clicks |
| Unstable in depressions, bottoms easily | Too little high-speed compression | Increase high-speed compression by 6 clicks |
| Harsh, rigid, hops under braking | Too much high-speed compression | Decrease high-speed compression by 6 clicks |
The key is knowing which “speed” you’re dealing with. That sharp-edged pothole is a high-speed event. The long, rolling swell in the asphalt is low-speed.
What Does Rebound Damping Control?
Rebound damping decides how quickly the suspension extends after being compressed. It controls wheel recovery, chassis settling, and weight transfer. Get it right and the bike feels planted. Get it wrong and it oscillates.
According to the MC Tuning Guide, rebound is critical for managing tire load: less front rebound allows weight transfer to the rear under acceleration. Less rebound in the rear allows for greater weight transfer to the front under braking and turn-in. This is why Öhlins recommends you start tuning with rebound damping.
Common mistake: Cranking rebound to full hard to “control” the bike. The wheel cannot recover in time for the next bump. By the third bump in a sequence, the suspension is packed down and you’re riding on the spring, not the damper. The ride turns harsh and grip vanishes.
Symptoms of Too Much or Too Little Rebound
- Too little rebound: The bike feels loose, bouncy, and wallowy after a bump. The rear wants to “kick” up too fast.
- Too much rebound: The suspension returns too slowly. Over a series of bumps, it “packs down,” losing travel and making the ride harsh. The tire loses contact.
Öhlins provides a clear test: if the motorcycle feels unstable, loose, and bouncy, increase rebound damping by 4 clicks. If it feels harsh and bumpy over a series of bumps, decrease rebound damping by 4 clicks.
How to Find and Adjust Your Damping Clickers
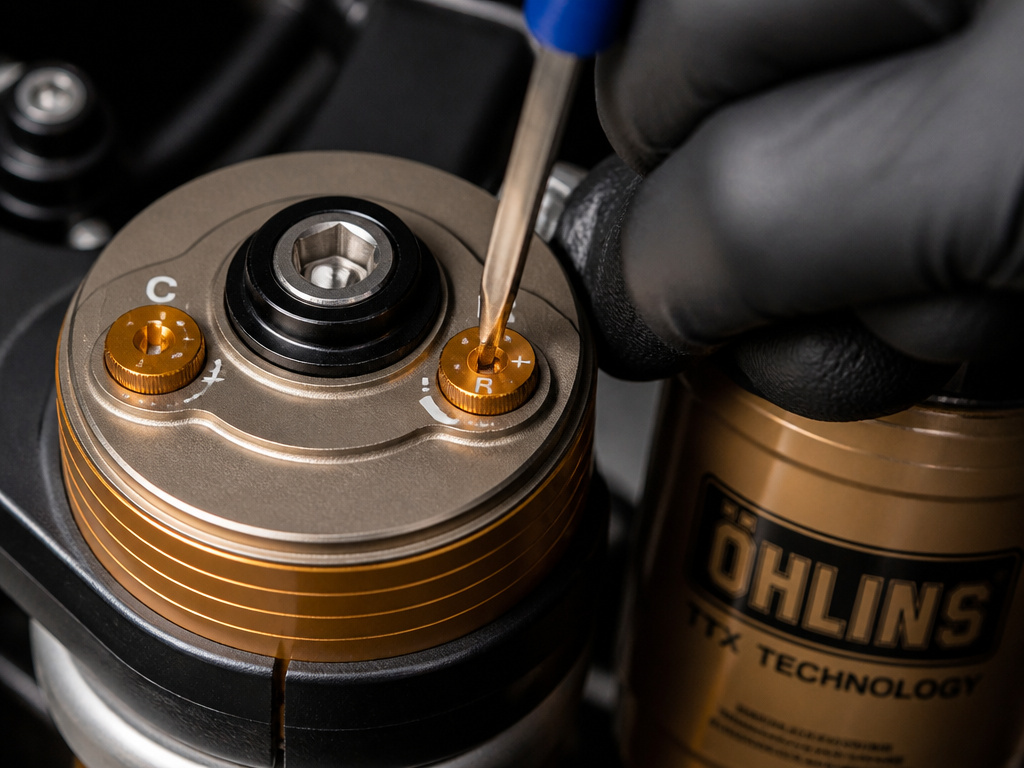
Before you turn anything, find the adjusters. They are typically small wheels or screws, often labeled. Front fork compression is usually on the right fork cap; rebound is on the left. Rear shock adjusters are on the shock body or reservoir.
The Critical First Step: Establishing “Zero”
Manufacturers disagree on where “zero” is. This is the most important concept most riders miss.
| Brand / Source | Zero Point Definition | Adjustment Method |
|---|---|---|
| Öhlins | Fully closed position (position zero) | Turn clockwise to close, then count clicks open. Warns against turning to mechanical stop. |
| K-Tech | Fully closed (clockwise) position | All settings made from fully closed position. |
| Harley-Davidson | Maximum (hard) stop | Turn clockwise until it stops, then back out recommended turns (e.g., 1 turn for Standard). |
| Yamaha | Stop (Maximum) | Turn adjuster clockwise until it stops, then count clicks counter-clockwise. |
Here is what actually held up in practice: for street bikes, use the manufacturer’s published baseline as your zero. If Harley says Standard mode is 1 turn from hard, start there. For aftermarket shocks like Öhlins or K-Tech, follow their manual: start from fully closed. Never force an adjuster against a stop. Harley-Davidson, Yamaha, and Öhlins all warn that excessive force can damage the adjusting valves.
A Step-by-Step Tuning Procedure
- Set your sag first. Damping cannot compensate for wrong spring preload. This step is essential.
- Start with rebound damping. Set it to the manufacturer’s baseline. Ride over a known, repetitive bump series (like a washboard road section). Is it bouncy? Add two clicks. Is it packing down? Subtract two clicks. Re-ride.
- Then tune compression. Use a road with a mix of sharp bumps and long dips. Does the bike feel vague or bottom? Add two clicks of low-speed compression. Is it harsh? Subtract two.
- Make one change at a time. Write down your setting, ride the same test loop, and note the change. This takes an afternoon but ends the guesswork.
Where this goes sideways: Changing both rebound and compression between test rides. You will have no idea which change caused the improvement (or the new problem). An afternoon of disciplined one-clicker tuning beats a year of random adjustments.
The Penske 8900 Series rebound adjuster has an adjustment range of +/- 36 clicks. Öhlins recommends a basic adjustment range of ±5 clicks from the original (basic) setting for both compression and rebound damping. This gives you an idea of the working zone: you’re looking for 4-8 clicks of change from your starting point, not 20.
Low-Grip vs. High-Grip: When to Change Your Settings
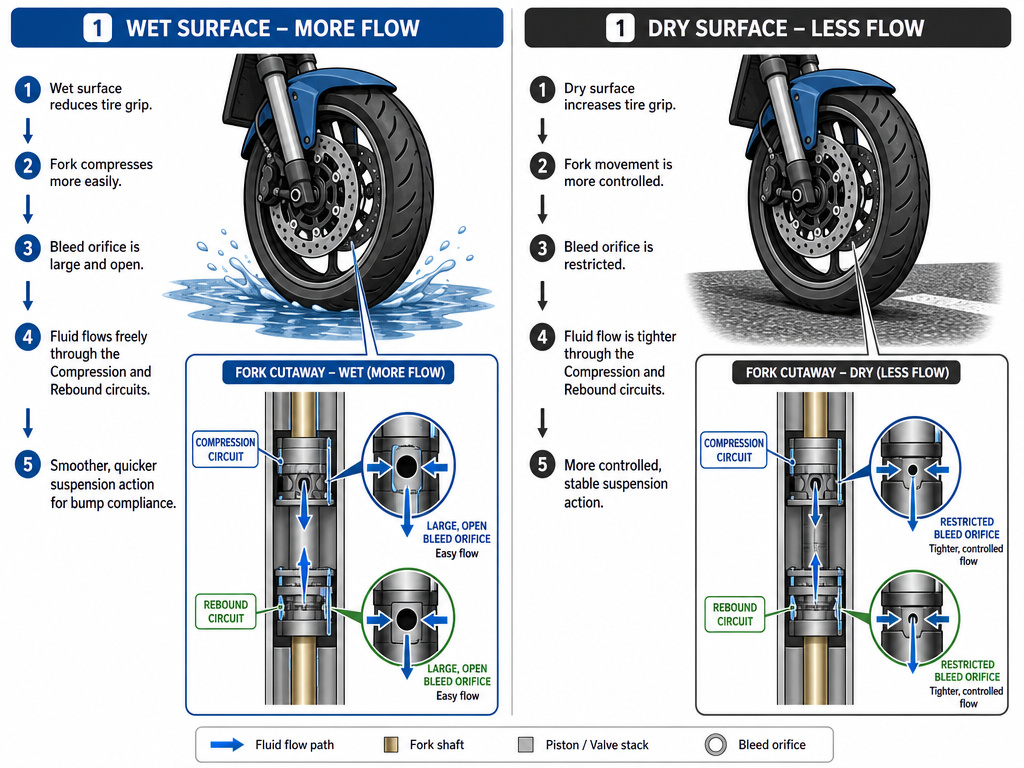
Your perfect dry-road setup might be terrible in the rain. The MC Tuning Guide is explicit about this: in rain or low grip situations, allowing more bleed or less low-speed damping is desirable to delay tire loading upon initial roll. This gives the tire more time to conform and find grip.
Conversely, in dry high grip conditions, adding damping or restricting bleed will load the tire sooner upon initial roll increasing platform stability.
This means you have permission, even a mandate, to run softer damping in the wet. If your bike has electronic suspension like Honda’s Electronically Controlled Suspension, this is what the RAIN mode is doing: reducing damping forces for lower grip.
How does a shock absorber create damping force?
Damping force is generated by forcing oil through a series of restrictive passages and valves. Inside the shock, a piston attached to the shaft moves through an oil-filled chamber. On the compression stroke, oil above the piston is pressurized and must flow through a dedicated compression adjuster bleed valve and past a flexible shim stack into the reservoir. This restriction controls how easily the shock compresses. On the rebound stroke, the spring pushes the shaft out, pressurizing the oil below the piston. This oil is then forced through a separate rebound adjuster bleed valve and its own shim stack to control the speed of extension. The adjuster screws you turn change the size of these bleed passages, altering the oil flow rate and therefore the damping force.
What is high-speed vs. Low-speed compression damping?
Some advanced shocks separate compression damping into low-speed and high-speed circuits. Low-speed compression affects the shock’s response to slower movements like rider weight shifts, braking, and acceleration. It primarily influences ride height, smoothness over small bumps, and tire grip. High-speed compression handles fast, sharp impacts like hitting a pothole or a sharp edge. This circuit affects chassis stability, firmness in deep depressions, and behavior in fast corners. A general tuning principle is to adjust low-speed compression to manage grip and small-bump comfort, while high-speed compression is used to control bottoming and harshness from big hits. Always refer to your specific component’s manual, as adjustment ranges and starting procedures vary significantly.
Frequently Asked Questions
What happens if I have too much rebound damping on my motorcycle?
The suspension returns too slowly after compressing. Over consecutive bumps, it doesn’t recover all its travel, effectively “packing down.” This reduces available suspension movement, makes the ride harsh, and can cause the tire to skip over the pavement instead of following it, reducing grip.
Does compression damping affect rebound damping?
Yes, indirectly. They recommend adjusting them in sequence, not in isolation, and to correct by tweaking compression after setting rebound. The valves are interconnected within the same hydraulic system.
What is the 12-second rule for motorcycles?
This is unrelated to suspension damping. The “12-second rule” is a visual lead-time riding technique, suggesting you scan the road 12 seconds ahead for potential hazards. It’s a safety tip, not a suspension setting.
Should I adjust the front or rear first?
Always start with the rear shock. The rear suspension has a much greater effect on the motorcycle’s overall balance and how the front end behaves.
The Bottom Line
When analyzing compression vs rebound damping on a motorcycle, compression handles the hit, and rebound handles the recovery. The right balance keeps the tire on the ground.
For most riders, the factory settings are a safe, competent baseline. The first upgrade isn’t a new shock, it’s a correct sag setup and an afternoon spent learning what one clicker actually does on your favorite road. If you do change damping, let the manufacturer’ definition of “zero” be your guide, not the mechanical stop. And in the rain, give yourself permission to back things off a few clicks. The grip you gain is real.
The goal isn’t a perfect spec sheet. It’s a bike that feels predictable, whether you’re dealing with a single bump or a series of them. This predictable feeling allows you to push harder, corner more smoothly, and ride home with greater confidence.
